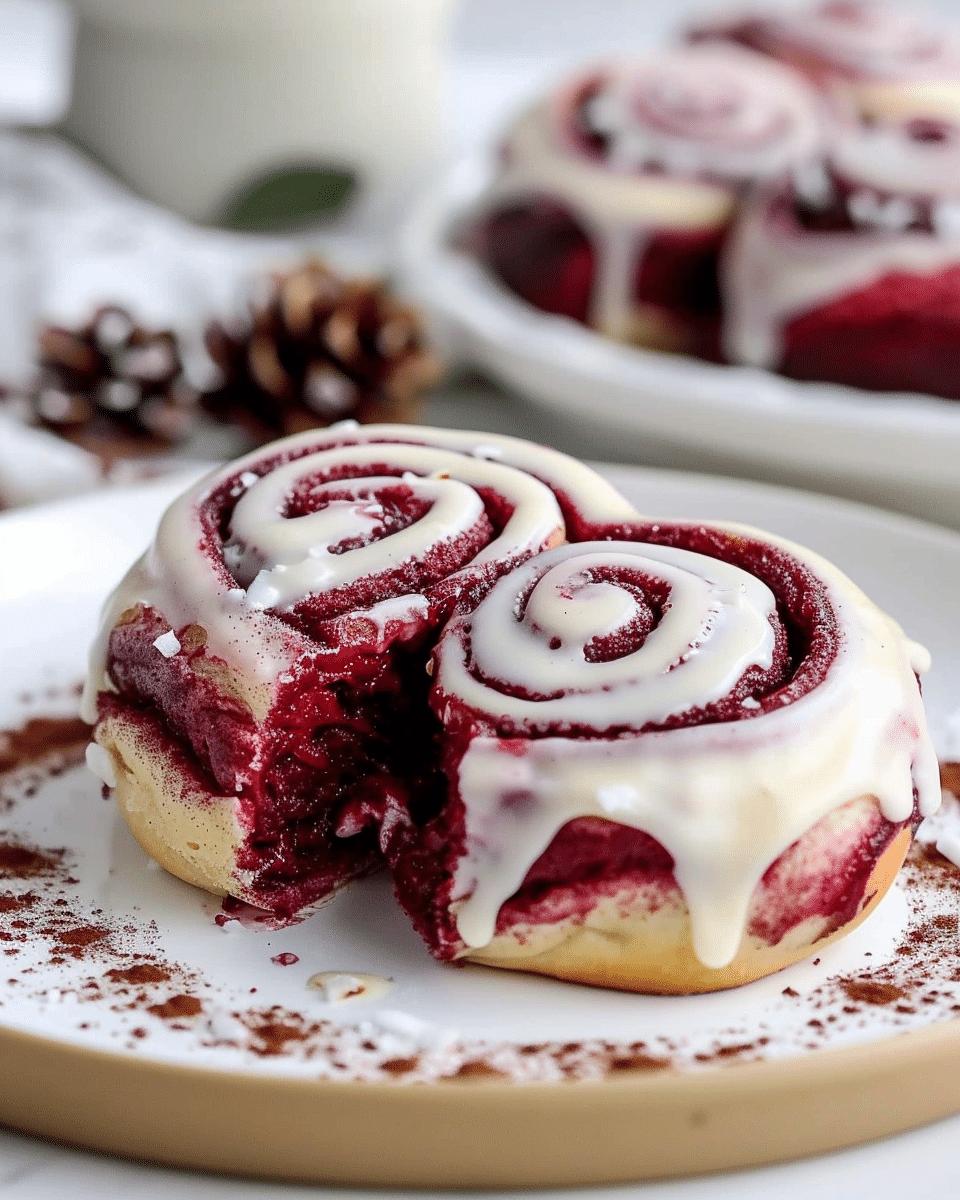
These Red Velvet Cinnamon Rolls are the perfect combination of two of my favorite indulgent treats—soft, fluffy cinnamon rolls and the rich flavor of red velvet. The dough has a delicate cocoa undertone, swirled with cinnamon-sugar, and topped with an irresistible cream cheese frosting. Whether you’re looking for a special breakfast, brunch treat, or a dessert to impress, these rolls hit all the right notes. They’re sweet, tender, and totally delicious.
Why You’ll Love This Recipe
I love this recipe because it brings together the best elements of two classic favorites: red velvet cake and cinnamon rolls. The slight bitterness of cocoa in the dough balances perfectly with the sweetness of the cinnamon filling, while the cream cheese frosting adds a rich, tangy contrast that takes these rolls to another level. Plus, they’re soft and pillowy with a gorgeous swirl that makes every bite feel like a celebration. The texture is perfect, and the vibrant red color makes them irresistible—perfect for any occasion!
Ingredients
For the Dough:
-
3 ¼ cups all-purpose flour
-
¼ cup granulated sugar
-
2 ¼ tsp active dry yeast (1 packet)
-
1 tsp salt
-
2 tbsp unsweetened cocoa powder
-
¾ cup whole milk, warmed
-
¼ cup unsalted butter, melted
-
1 large egg
-
1 tsp vanilla extract
-
1-2 tbsp red food coloring
For the Cinnamon Filling:
-
½ cup unsalted butter, softened
-
½ cup brown sugar, packed
-
2 tbsp ground cinnamon
For the Cream Cheese Frosting:
-
4 oz cream cheese, softened
-
¼ cup unsalted butter, softened
-
1 ½ cups powdered sugar
-
1 tsp vanilla extract
-
1-2 tbsp milk (as needed for consistency)
(Here’s a tip: Check out the full list of ingredients and measurements in the recipe card below.)
Directions
-
In a large mixing bowl, I whisk together the flour, sugar, yeast, salt, and cocoa powder.
-
In another bowl, I combine the warm milk, melted butter, egg, vanilla extract, and red food coloring, stirring until everything is well mixed.
-
Gradually, I add the wet ingredients to the dry ingredients, mixing until a soft dough begins to form.
-
I knead the dough on a lightly floured surface for about 5-7 minutes until it’s smooth and elastic.
-
Then, I place the dough in a greased bowl, cover it with a clean towel, and let it rise in a warm place for about 1 hour or until it doubles in size.
-
While the dough rises, I prepare the cinnamon filling by mixing softened butter, brown sugar, and cinnamon in a small bowl until it’s well combined.
-
Once the dough has risen, I punch it down and roll it out on a floured surface into a large rectangle, approximately 12×18 inches.
-
I spread the cinnamon filling evenly over the dough, leaving a small border around the edges.
-
Starting from the long side, I tightly roll the dough into a log. Then, I cut it into 12 equal slices using a sharp knife or dental floss.
-
I place the rolls into a greased 9×13-inch baking dish, cover them, and let them rise for another 20-30 minutes.
-
Preheating the oven to 350°F (175°C), I bake the rolls for 20-25 minutes, or until they’re lightly golden and cooked through.
-
While the rolls bake, I beat the cream cheese and butter together until creamy. Gradually, I add powdered sugar and vanilla extract, mixing until smooth. If needed, I add milk to reach the desired consistency.
-
Once the rolls are done, I spread the cream cheese frosting over the warm rolls and serve immediately.
Servings and Timing
-
Servings: 12 rolls
-
Prep time: 30 minutes
-
Cook time: 25 minutes
-
Total time: 55 minutes
Variations
I’ve made a few variations of these Red Velvet Cinnamon Rolls before and had great success:
-
For an extra indulgent treat, I’ve added chopped chocolate or chocolate chips to the cinnamon filling.
-
If I’m in the mood for a bit of a twist, I sometimes swap the cream cheese frosting for a simple glaze made with powdered sugar, vanilla, and a bit of milk.
-
I’ve also tried making mini versions of these rolls by cutting the dough into smaller pieces and adjusting the bake time accordingly.
Storage/Reheating
I love how well these Red Velvet Cinnamon Rolls store. If I have leftovers (which isn’t often!), I keep them in an airtight container at room temperature for up to 2 days. For longer storage, I freeze them, tightly wrapped, for up to a month. When I’m ready to enjoy them, I either reheat them in the microwave for 20-30 seconds or pop them in the oven at 350°F for 5-10 minutes to bring back their soft, fresh texture.
FAQs
Can I use a different color for the dough?
Sure! While red food coloring gives the dough its signature look, I’ve used other colors, like pink or even green, to make it unique for different holidays or occasions.
Can I use instant yeast instead of active dry yeast?
Yes, you can! If you’re using instant yeast, there’s no need to activate it in warm milk. Just add it directly to the dry ingredients, and continue with the recipe as directed.
Can I make the dough in advance?
Yes, I’ve made the dough ahead of time and stored it in the refrigerator overnight. Just let it rise as instructed when you’re ready to bake the rolls. The dough will still turn out perfectly!
What if I don’t have whole milk?
If I don’t have whole milk on hand, I’ve used 2% milk or even a milk alternative like almond or oat milk. The rolls still turn out great!
Can I make these rolls without the frosting?
While I love the cream cheese frosting, you can absolutely skip it if you prefer. The cinnamon rolls are delicious on their own, or you could drizzle them with a simple glaze.
Conclusion
These Red Velvet Cinnamon Rolls are a showstopper! They combine the richness of red velvet with the comforting goodness of cinnamon rolls, making them perfect for any occasion. The dough is soft and fluffy, and the cinnamon filling is just the right amount of sweet and spiced. Topped with cream cheese frosting, these rolls are a delightful treat that will have everyone asking for the recipe. Whether I make them for a special brunch or enjoy them as a dessert, they always bring a smile to my face!
Red Velvet Cinnamon Rolls
5 Stars 4 Stars 3 Stars 2 Stars 1 Star
No reviews
- Author: Olivia
- Total Time: 55 minutes
- Yield: 12 rolls
- Diet: Vegetarian
Description
These Red Velvet Cinnamon Rolls combine the rich flavor of red velvet with the comforting goodness of cinnamon rolls. With a delicate cocoa dough, cinnamon-sugar swirl, and irresistible cream cheese frosting, they are perfect for any occasion.
Ingredients
For the Dough:
3 ¼ cups all-purpose flour
¼ cup granulated sugar
2 ¼ tsp active dry yeast (1 packet)
1 tsp salt
2 tbsp unsweetened cocoa powder
¾ cup whole milk, warmed
¼ cup unsalted butter, melted
1 large egg
1 tsp vanilla extract
1-2 tbsp red food coloring
For the Cinnamon Filling:
½ cup unsalted butter, softened
½ cup brown sugar, packed
2 tbsp ground cinnamon
For the Cream Cheese Frosting:
4 oz cream cheese, softened
¼ cup unsalted butter, softened
1 ½ cups powdered sugar
1 tsp vanilla extract
1-2 tbsp milk (as needed for consistency)
Instructions
- In a large mixing bowl, whisk together the flour, sugar, yeast, salt, and cocoa powder.
- In another bowl, combine the warm milk, melted butter, egg, vanilla extract, and red food coloring, stirring until everything is well mixed.
- Gradually add the wet ingredients to the dry ingredients, mixing until a soft dough begins to form.
- Knead the dough on a lightly floured surface for 5-7 minutes until it’s smooth and elastic.
- Place the dough in a greased bowl, cover with a clean towel, and let it rise in a warm place for 1 hour, or until doubled in size.
- Prepare the cinnamon filling by mixing softened butter, brown sugar, and cinnamon until combined.
- Once the dough has risen, punch it down and roll it out into a 12×18-inch rectangle.
- Spread the cinnamon filling evenly over the dough, leaving a small border around the edges.
- Starting from the long side, tightly roll the dough into a log and cut it into 12 equal slices using a sharp knife or dental floss.
- Place the rolls into a greased 9×13-inch baking dish, cover, and let them rise for 20-30 minutes.
- Preheat the oven to 350°F (175°C) and bake the rolls for 20-25 minutes, or until golden and cooked through.
- While the rolls bake, beat the cream cheese and butter until creamy. Gradually add powdered sugar and vanilla, mixing until smooth. If needed, add milk to reach the desired consistency.
- Once the rolls are done, spread the cream cheese frosting over the warm rolls and serve immediately.
Notes
- For extra indulgence, you can add chopped chocolate or chocolate chips to the cinnamon filling.
- If you prefer a glaze instead of frosting, mix powdered sugar, vanilla, and a bit of milk for a simple glaze.
- Mini versions can be made by cutting the dough into smaller pieces and adjusting the baking time.
- The dough can be made ahead and refrigerated overnight. Let it rise as instructed when you’re ready to bake.
- Prep Time: 30 minutes
- Cook Time: 25 minutes
- Category: Dessert
- Method: Baking
- Cuisine: American
Nutrition
- Serving Size: 1 roll
- Calories: 250
- Sugar: 22g
- Sodium: 180mg
- Fat: 12g
- Saturated Fat: 7g
- Unsaturated Fat: 5g
- Trans Fat: 0g
- Carbohydrates: 33g
- Fiber: 1g
- Protein: 3g
- Cholesterol: 35mg

